Top 10 ways to get fit in 2 weeks at home
 |
| image source - google/credit infinitysources |
10. Supine Reverse Crunches
 |
| image source - google / credit coachmag. |
BODY PART: Abs
Step 1
Starting Position: Lie in a supine (on your returned) role on a mat together with your knees bent, ft flat on the floor and hands spread out in your aspects together with your arms dealing with down. Gently exhale, stiffen your torso via contracting your belly/centre muscle mass ("bracing") and slowly raise your ft off the floor, elevating your knees without delay above your hips whilst keeping a 90-degree bend within the knees. Hold this function and breathe usually. Use your arms as a stability help.
Step 2
Upward Phase: Exhale, contract your stomach, middle and hip flexor muscle mass and slowly improve your hips off the mat, rolling your spine up as if trying to bring your knees closer to your head (your hips and pelvis should move in the direction of your rib cage). Avoid any trade within the perspective of your knees in the course of the roll-up. Use your palms and arms to assist with maintaining your balance and maintain to twist-up until your spine can not roll any similarly. Hold this position in brief.
Step 3
Downward Phase: Gently inhale and lower your spine lower back closer to the mat in a managed fashion, transferring your top thighs backwards until they are placed immediately over your hips. Continue rolling out till your spine and pelvis (hips) contact the mat and your knees are placed immediately over your hips with a 90-degree bend along with your decreased leg.
Proper form is essential whilst appearing this exercise to prevent excessive stress for your low lower back. When returning to your beginning role at some stage in the repetitions, control your leg motion ensuring that your knees do not pass beyond your hips, but instead go back to a position at once above your hips. Since the abdominals join the rib cage to the pelvis, the emphasis of the motion has to be on pulling your pelvis upwards towards your rib cage.
9. Side Plank with Bent Knee
 |
| image source - google / credit muscle |
BODY PART: Abs, Butt/Hips
Step 1
Starting Position: Lie on your proper aspect on an exercise mat along with your left leg mendacity immediately over your right leg and bend your knees to a cozy function. Raise your upper frame to support yourself on your right arm, your right elbow need to bend to ninety tiers and be positioned immediately beneath your shoulder. Align your head together with your spine and hold your hips and decrease knee in contact with the workout mat.
Step 2
Upward Phase: Exhale, lightly agree your belly/core muscles to stiffen your spine and lift your hips off the mat, however maintaining touch with your knee, and head aligned along with your backbone.
Step 3
Lowering Phase: Inhale and gently return yourself for your starting function.
Step 4
Exercise Variation: You can boom the exercise depth by means of growing the duration of time you are within the raised role.
8. Front Plank
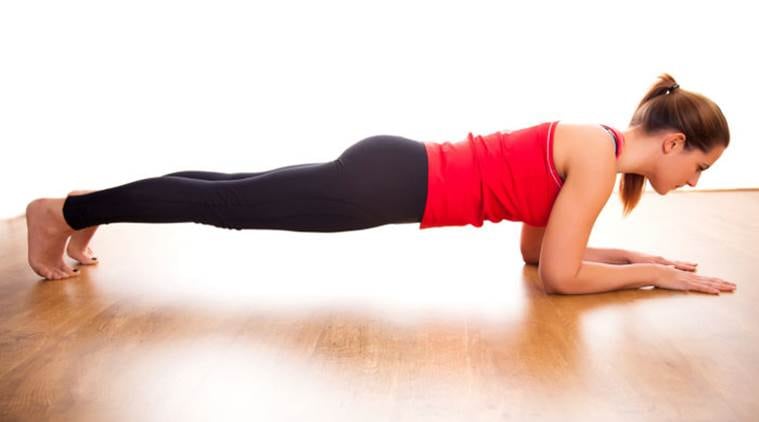 |
| image source - google / credit indianexpress |
BODY PART: Abs, Back
Step 1
Starting Position: Lie prone (for your stomach) on an exercise mat or floor along with your elbows near your aspects and at once beneath your shoulders, palms down and arms going through forward. Contract your quadriceps to extend your legs and dorsiflex your ankles (pull toes towards your shins). Contract your middle and stomach muscle groups to stiffen your torso.
Step 2
Upward Phase. Slowly lift your complete torso off the ground or mat, preserving a stiff torso and legs. Avoid any arching (sagging) for your low lower back, trekking (upwards) for your hips or bending within the knees. Avoid shrugging your shoulder and keep your shoulders placed without delay over your elbows along with your palms dealing with down. Continue to breathe at the same time as retaining this role for a precise time (5+ seconds).
Step 3
Downward Phase: While preserving a stiff torso and extended knees, gently decrease your body back toward the mat or ground before relaxing.
If you revel in any ache within the low again with this movement, stop the exercise right away and consult with your medical doctor.
7. Push-up with Single-leg Raise
 |
| image source - google / credit upl.stack |
BODY PART: Arms, Butt/Hips, Chest, Full Body/Integrated, Shoulders
Step 1
Starting Position: Kneel on an exercise mat or ground and produce your feet together behind you.
Step 2
Slowly bend forward to area your arms flat at the mat, positioning your fingers shoulder-width aside along with your fingers dealing with forward. Slowly shift your weight ahead until your shoulders are placed without delay over your fingers. Reposition your fingers as had to allow complete extension of your body without any bend on the hips or knees. Stiffen your torso via contracting your core and abdominal muscle mass ("bracing") and align your head along with your backbone. Place your ft collectively with your ankles dorsiflexed (feet pointed toward your shins).
Step 3
Downward Phase: Slowly lower your frame toward the ground while keeping an inflexible torso and head aligned together with your spine. Do now not allow your low back to sag or your hips to hike upwards in the course of this downward segment, contract your glutes (butt) and quadriceps (thigh) muscle mass to create balance on your core. Continue to lower yourself till your chest or chin contact the mat or ground. Your elbows need to stay close to the edges of your body or be allowed to flare outwards slightly.
Step 4
Upward Phase: Press upwards via your palms whilst keeping an inflexible torso and head aligned along with your spine. As your press upwards, make bigger your left hip lift your left foot off the floor, keeping the knee extended. Attempt to avoid rotation on your hip as you boost the left leg off the ground. Do no longer permit your low again to sag or your hips to hike upwards. Continue pressing till the hands are absolutely prolonged on the elbows and your left leg is extended off the floor. Hold this function briefly earlier than returning for your beginning role. Repeat along with your opposite leg
Pushing through the heel and outside floor of your palm offers greater force to your press and stability in your shoulders.
6. Bent-Knee Sit-up / Crunches
 |
| image source - google / credit inposture |
BODY PART: Abs
Step 1
Starting Position: Lie in a supine (for your lower back) role on a mat with your knees bent, ft flat at the ground and heels 12 - 18" out of your tailbone.
Step 2
Place your fingers behind your head, squeezing your scapulae (shoulder blades) collectively and pulling your elbows back without arching your low back. This elbow position should be maintained all through the workout. Align your head together with your backbone, however, allow it to move into slight flexion (shifting the chin in the direction of the chest) during the upward segment of the workout.
Step 3
Upward Phase: Exhale, agree your stomach and centre muscle tissue and flex your chin barely towards your chest even as slowly curling your torso towards your thighs. The movement must be cognizance of pulling your rib cage in the direction of your pelvis (the neck stays comfy while the chin is tucked in the direction of the neck). Your feet, tailbone and decrease returned must stay in touch with the mat at all times. Continue curling up till your upper return is lifted off the mat. Hold this function briefly.
Step 4
Downward Phase: Gently inhale and slowly uncurl (lower) your torso again in the direction of the mat in a managed fashion maintaining your toes, tailbone and coffee lower back in contact with the mat.
Proper form is important for this workout to prevent excessive strain in your low return. Individuals typically perform this movement too unexpectedly and recruit the hip flexors to help with the upward segment. This approach tilts the pelvis anteriorly, increasing the pressure on the low returned and have to be avoided. The abdominals join the rib cage to the pelvis so the motion needs to be cognizant of bringing these two frame components nearer together whilst retaining the neck and shoulders comfy.
5. Downward-facing Dog
 |
| image source - google / credit yoursight |
BODY PART: Arms, Chest, Shoulders
Step 1
Starting Position: Kneel on an exercising mat or ground and bring your ft collectively in the back of you.
Step 2
Slowly bend ahead to region your palms flat at the mat, positioning your palms shoulder-width aside with your fingers facing forward. Slowly shift your weight forward until your shoulders are located at once over your arms. Reposition your fingers as needed to allow full extension of your body from the knees without any bend on the hips. Stiffen your torso by contracting your middle and abdominal muscle groups ("bracing").
Step 3
Downward Phase: Slowly lower your body closer to the floor while retaining a rigid torso and head aligned along with your spine. Do now not allow you're low returned to sag or your hips to hike upwards all through this downward section. Continue to lower yourself till your chest or chin touch the mat or ground. Your elbows should remain close to the sides of your body or flare outwards slightly.
Step 4
Upward Phase: Press upwards thru your palms whilst retaining a rigid torso and head aligned along with your spine. Do now not allow you are low returned to sag or your hips to hike upwards. Continue pressing till the palms are completely extended on the elbows.
Push-americaregion pressure upon the wrist joints. To alleviate a number of this strain you may prefer to use dumbbells and grip the handles as opposed to vicinity your hands on the floor. If you are urgent from an elevation together with a dumbbell, you do now not want to lower your chest or chin to the floor, but instead decrease your self till your chest or chin are staged with the dumbbell handles.
4. Bent Knee Push-up
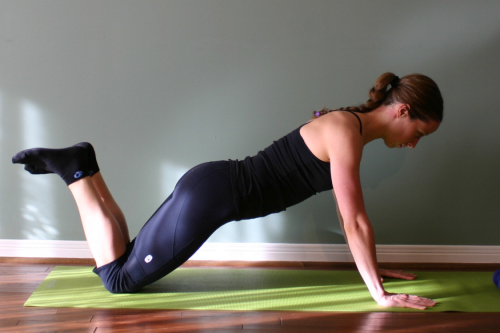 |
| image source - google / credit reetrainers |
BODY PART: Arms, Chest, Shoulders
Step 1
Starting Position: Kneel on an exercise mat or ground and produce your ft collectively at the back of you.
Step 2
Slowly bend ahead to vicinity your hands flat at the mat, positioning your arms shoulder-width aside together with your arms going through forward. Slowly shift your weight ahead until your shoulders are located directly over your palms. Reposition your fingers as needed to allow full extension of your body from the knees without any bend at the hips. Stiffen your torso with the aid of contracting your centre and belly muscle groups ("bracing").
Step 3
Downward Phase: Slowly lower your frame towards the ground whilst preserving an inflexible torso and head aligned with your backbone. Do no longer allow your low again to sag or your hips to hike upwards throughout this downward segment. Continue to decrease yourself till your chest or chin contact the mat or ground. Your elbows must remain close to the edges of your body or flare outwards slightly.
Step 4
Upward Phase: Press upwards via your fingers at the same time as keeping an inflexible torso and head aligned along with your spine. Do now not allow you're low returned to sag or your hips to hike upwards. Continue pressing till the hands are completely extended at the elbows
Push-united states of America are strain upon the wrist joints. To alleviate some of this strain you can prefer to use dumbbells and grip the handles as opposed to place your arms on the floor. If you are pressing from an elevation such as a dumbbell, you do now not want to lower your chest or chin to the floor, however, instead decrease yourself until your chest or chin are staged with the dumbbell handles.
3. Contralateral Limb Raises
 |
| image source - google / credit scontent |
BODY PART: Back, Butt/Hips, Shoulders
Step 1
Starting Position: Lie susceptible (to your belly) on a mat with your legs prolonged, ankles barely plantarflexed (feet pointing away from your shins), hands prolonged overhead with arms going through every other. Relax your head to align it with your backbone.
Step 2
Upward Phase: Exhale, agree your abdominal/middle muscle mass stabilize your backbone and slowly raise one arm a few inches off the floor retaining your arm extended and heading off any rotation to your arm. Maintain your head and torso function, keeping off any arching for your return or raising of your head. Hold this position briefly.
Step 3
Downward Phase: Gently inhale and lower your arm returned in the direction of your beginning role with no motion to your low again or hips.
Step 4
Exercise Variation (1): From your starting position, agreement your stomach and core muscular tissues to stabilize your backbone and slowly increase one hip (enhance one leg) some inches off the floor preserving your leg prolonged, ankle plantarflexed (feet pointing faraway from your shins) and averting any rotation in your leg. Maintain your head and torso role, warding off any arching on your back or raising of your head. Hold this role briefly before returning for your starting role.
Step 5
Exercise Variation(2): From your starting role, contract your abdominal/centre muscle tissues to stabilize your backbone and slowly extend one hip (increase one leg) a few inches off the ground whilst simultaneously elevating the alternative arm some inches off the floor. Keep both your leg and arm prolonged and keeping off any rotation in every. Maintain your head and torso role, keeping off any arching to the again or raising of your head. Hold this function briefly earlier than returning in your starting function.
2. Push-up
 |
| image source - google / credit cloudfront |
BODY PART: Arms, Chest, Shoulders
Step 1
Starting Position: Kneel on an exercise mat or floor and convey your feet together at the back of you.
Step 2
Slowly bend forward to vicinity your arms flat on the mat, positioning your palms shoulder-width apart along with your fingers facing forward or grew to become slightly inward. Slowly shift your weight ahead until your shoulders are positioned at once over your arms. Reposition your fingers as had to permit full extension of your body with no bend at the hips or knees. Stiffen your torso by contracting your middle/belly muscle tissues ("bracing"), your glute and quadriceps muscular tissues and align your head along with your backbone. Place your ft together along with your ankles dorsiflexed (feet pointed toward your shins).
Step 3
Downward Phase: Slowly lower your body closer to the ground while preserving an inflexible torso and head aligned along with your spine. Do now not permit your low back to sag or your hips to hike upwards during this downward segment. Continue to decrease yourself till your chest or chin touch the mat/floor. Allow your elbows to flare outwards at some stage in the decreasing section
Step 4
Upward Phase: Press upwards via your arms at the same time as retaining a rigid torso and head aligned along with your spine. For extra electricity think about pushing the floor away from you. Do no longer permit your low back to sag or your hips to hike upwards. Continue urgent until the hands are absolutely prolonged at the elbows.
Step 5
An alternative position is to show your arms to face forwards and preserve your elbows near your aspects in the course of the downward phase. This shifts the emphasis from the chest muscle tissue onto the triceps and can lessen stresses in the shoulder joint.
Pushing thru the heel and outside floor of your palm gives greater pressure for your press and balance to your shoulders.
1. Supermans
 |
| image source - google / credit cdn.prod |


0 Comments